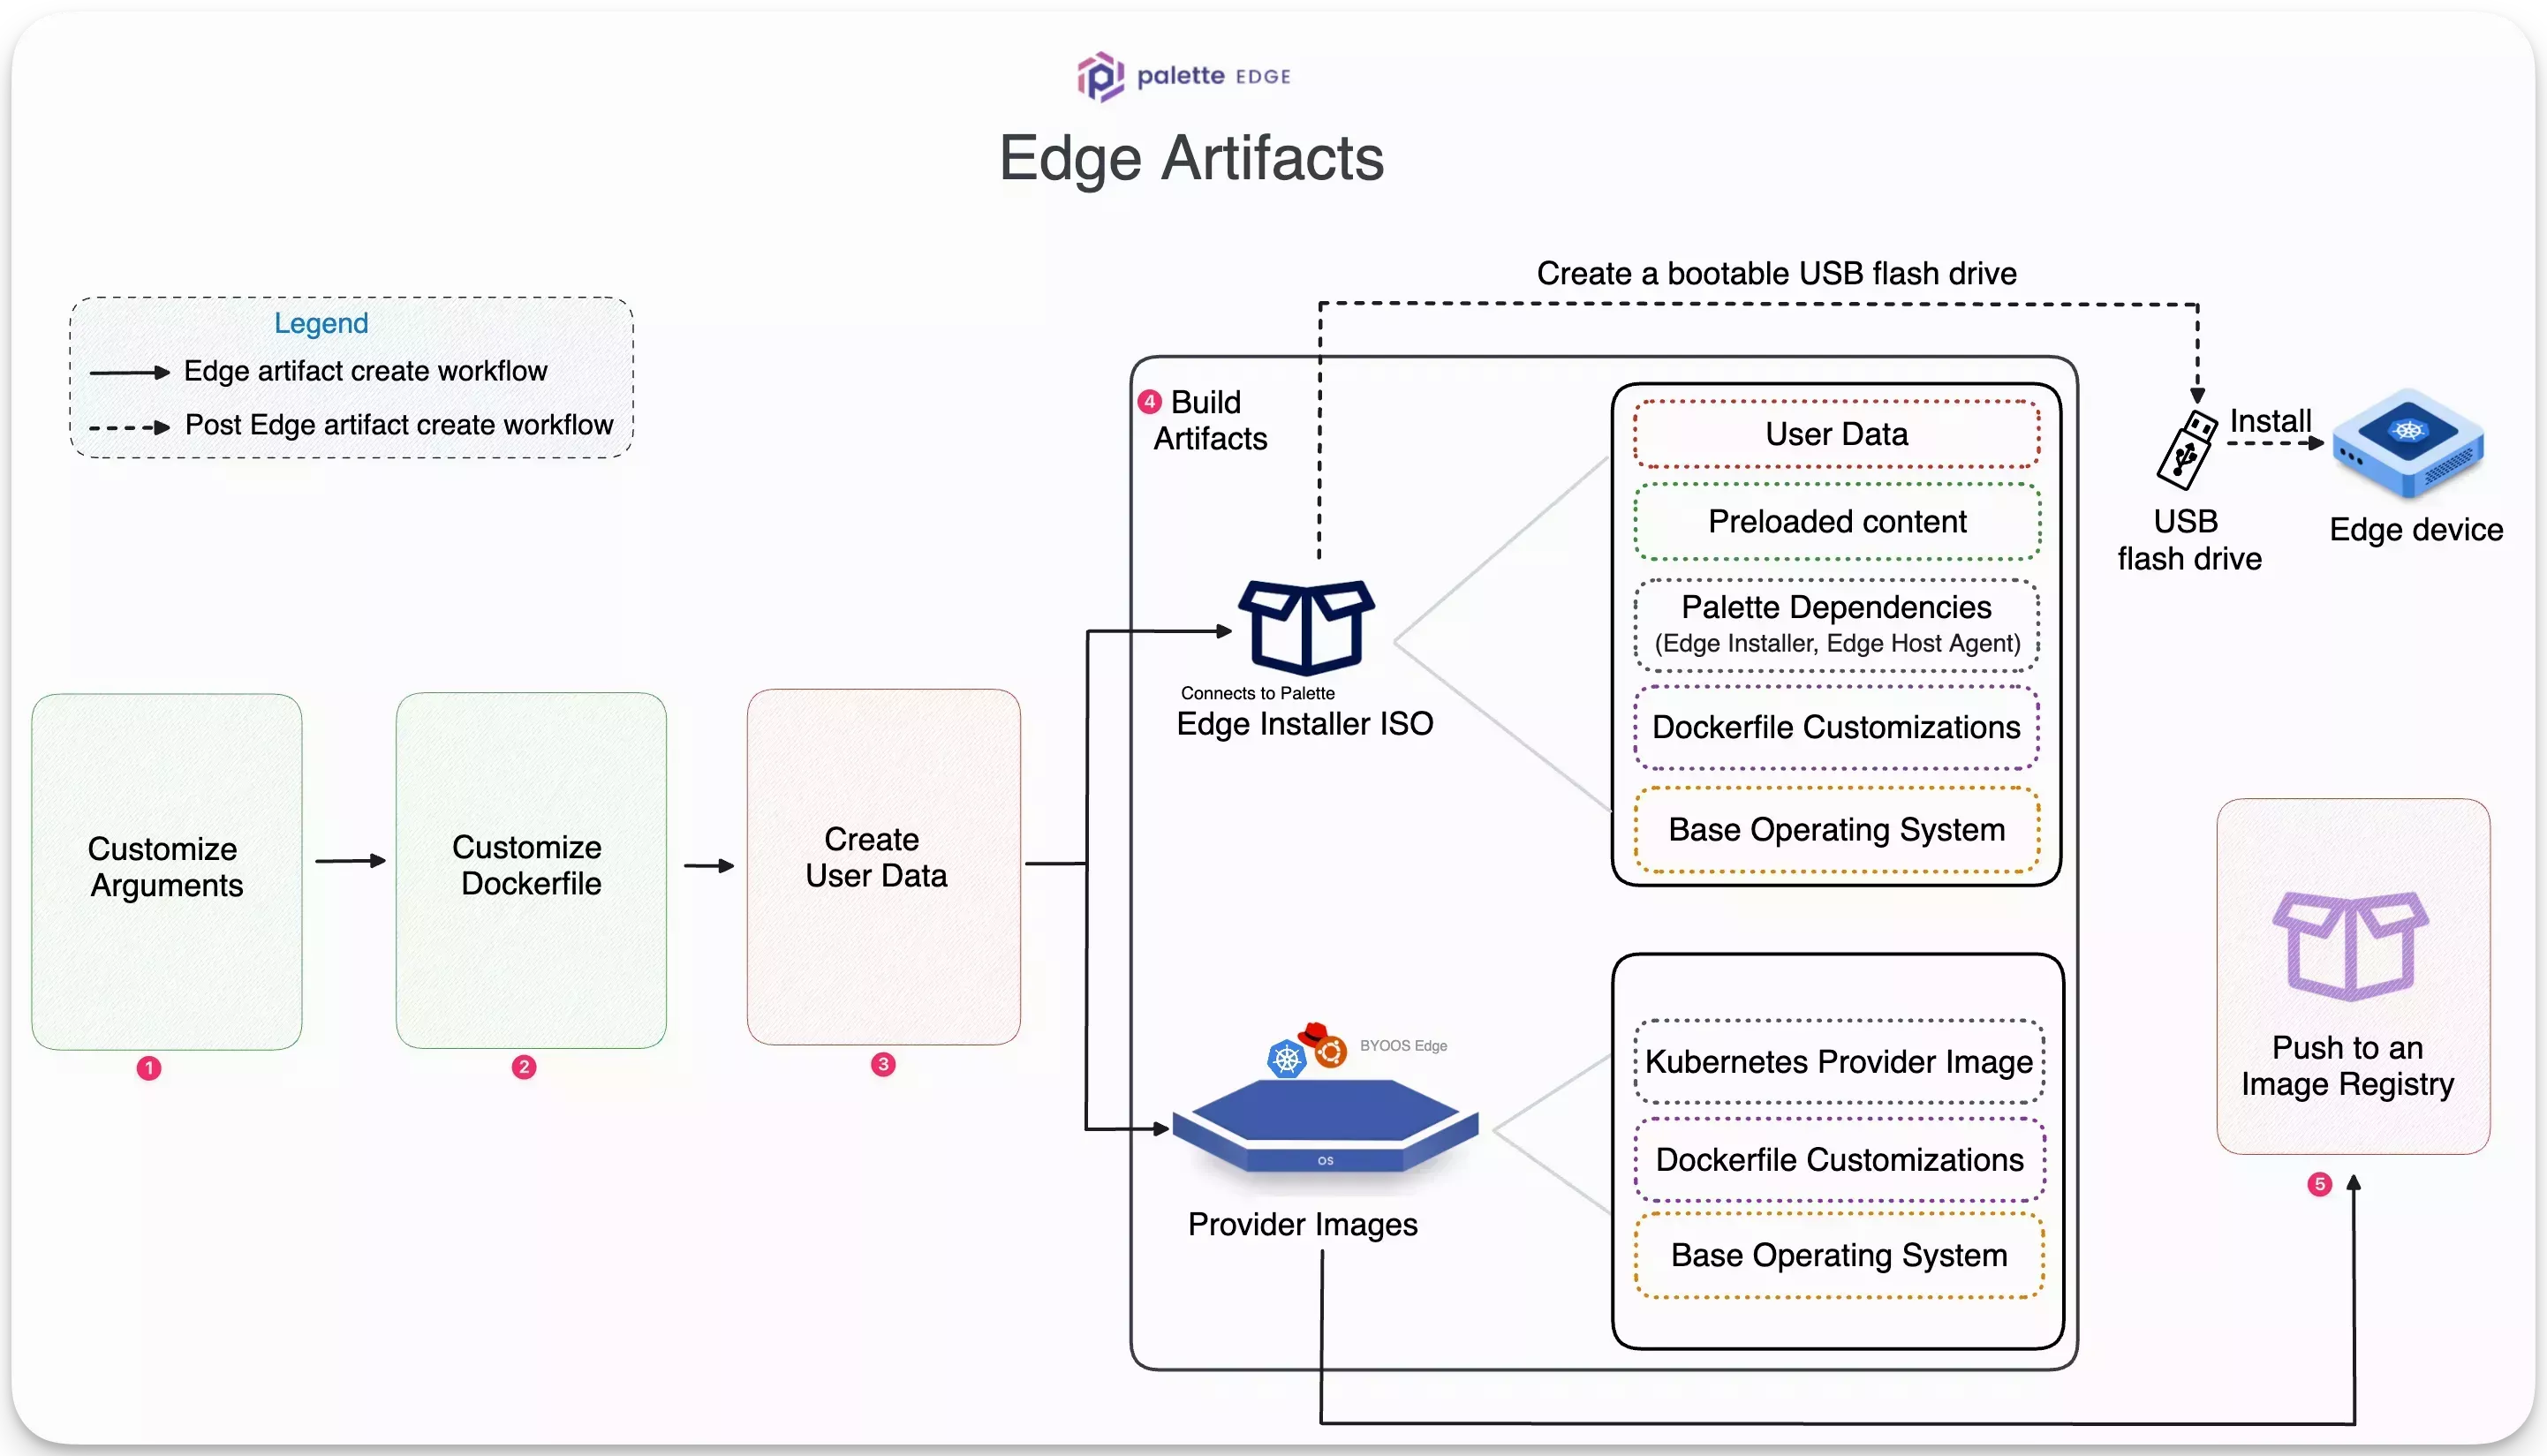
Build Edge Artifacts
Palette's Edge solution requires Edge hosts to be ready with the required dependencies and user data configurations before deploying a Kubernetes cluster. An Edge host requires the following artifacts to prepare for successful cluster deployment:
-
Edge installer ISO image - This bootable ISO image installs the necessary dependencies and configurations on a bare host machine. During installation, the host machine will boot from the Edge installer ISO, partition the disk, copy the image content to the disk, install the Palette Edge host agent and metadata, and perform several configuration steps. These configuration steps include registering the host with Palette, setting user privileges, and configuring network or security settings.
-
Provider Images - These are Kairos-based images containing the OS and the desired Kubernetes versions. These images install an immutable Operating System (OS) and software dependencies compatible with a specific Kubernetes version at runtime, i.e., during the cluster deployment. A provider image is used in the OS and the Kubernetes layer when creating a cluster profile.
In this guide, you will use the utility, CanvOS, to build an Edge installer ISO image and provider images for all the Palette-supported Kubernetes versions. The utility builds multiple provider images, so you can use either one that matches the desired Kubernetes version you want to use with your cluster profile.
If you want to build the ISO image and the provider images individually, refer to Build Provider Images and Build Installer ISO.
CanvOS is a utility that helps you build Edge artifacts. CanvOS is part of the EdgeForge workflow.
The diagram below shows the high-level steps to building the Edge artifacts and pushing the provider images to an image registry.
This guide presents two workflows - Basic and Advanced.
The basic workflow has minimal customizations and offers a quick start to build Edge artifacts. This workflow builds an Ubuntu based Edge installer ISO and provider images.
The advanced workflow uses more customization options. This workflow builds an openSUSE based Edge installer ISO and provider images.
You can follow either of the workflows below that suits your use case.
- Basic
- Advanced
Prerequisites
To complete this basic guide, you will need the following items:
-
A physical or virtual Linux machine with AMD64 (also known as x86_64) processor architecture to build the Edge artifacts. You can issue the following command in the terminal to check your processor architecture.
uname -m -
Minimum hardware configuration of the Linux machine:
- 4 CPU
- 8 GB memory
- 150 GB storage
-
Git. You can ensure git installation by issuing the
git --versioncommand. -
(Optional) Earthly is installed and available. If you do not install Earthly, you can still build the artifacts, but it would require root privileges, and some of the resulting artifacts will be owned by the root user.
-
An image management tool such as Docker or crane is installed and available.
infoIf you do not install Earthly, you must install Docker.
-
A Spectro Cloud account. If you have not signed up, you can sign up for an account here.
-
Palette registration token for pairing Edge hosts with Palette. You will need tenant admin access to Palette to generate a new registration token. For detailed instructions, refer to the Create Registration Token guide.
-
Access to an image registry.
infoThis guide uses a public Docker Hub registry as an example. You can use any other image registry that suits your requirements.
Instructions
Use the following instructions on your Linux machine to create all the required Edge artifacts with minimal customization.
-
Check out the CanvOS GitHub repository containing the starter code.
git clone https://github.com/spectrocloud/CanvOS.git -
Change to the
CanvOSdirectory.cd CanvOS -
View the available git tag.
git tag -
(Optional) If you are using a self-hosted instance of Palette, you need to build the ISO using the corresponding CanvOS version. Use the following command to identify the agent version for your Palette instance. Replace
<palette-endpoint>with your Palette endpoint and<api-key>with your Palette API key.curl --location --request GET 'https://<palette-endpoint>/v1/services/stylus/version' --header 'Content-Type: application/json' --header 'Apikey: <api-key>' | jq --raw-output '.spec.latestVersion.content | match("version: ([^\n]+)").captures[0].string'The output is the version number you must use to build the ISO. For example, if the output is
4.5.15, you must check out thev4.5.15tag in the CanvOS repository to build the ISO.Example output4.5.15
-
If you are using a self-hosted instance of Palette and have determined a specific CanvOS version, checkout out the corresponding tag.
Otherwise, check out the newest available tag. This guide uses the tag v4.7.2 as an example.
git checkout v4.7.2 -
Review the files relevant for this guide.
.arg.template- A sample.argfile that defines arguments to use during the build process.Dockerfile- Embeds the arguments and other configurations in the image.Earthfile- Contains a series of commands to create target artifacts.earthly.sh- Script to invoke theEarthfile, and generate target artifacts.user-data.template- A sample file containing user data.
-
Copy the .arg.template file from the CanvOS directory and name the copy .arg. Edit the
.argfile to include the following fields. These are the most commonly used fields.ARCHOS_DISTRIBUTIONOS_VERSIONK8S_DISTRIBUTIONK8S_VERSIONIMAGE_REGISTRYIMAGE_REPOCUSTOM_TAG
For more information about preparing the .arg file and full sample files, refer to
Prepare User Data and Argument Files.
-
Specify the system architecture, OS distribution, and version. These configurations apply to your Edge host's OS both before and after cluster formation.
- Specify the Kubernetes distribution and version. This is used with the OS distribution and version to create an immutable provider image with your specified OS and Kubernetes.
- Specify the image registry, image repository name, and custom tag for your provider images. The custom tag, together with the Palette agent version (the same number as the Git tag you are using), the version and distribution of Kubernetes, and the OS used by the image forms the tag of the image.
-
View the newly created file to ensure the customized arguments are set correctly.
cat .arg -
From the CanvOS directory, copy the user-data.template file and name the copy user-data. Edit the
user-datafile to include the following fields understylus.site.edgeHostTokenpaletteEndpointprojectName
The
user-datafile uses thecloud-initcloud-configformat. The first line of your file must be#cloud-configto ensure thatcloud-initrecognizes and applies the configuration correctly. Delete any unused arguments.#cloud-config
stylus:
site:
...Refer to Prepare User Data and Argument Files for more information about configuring your
user-datafile and to review sample files for different use cases. Refer to Cloud Init Stages, and the Edge Installer Configuration Reference for supported keys and stages.warning-
If you haven't set a default project for the registration token, ensure that you provide the
stylus.site.projectNameparameter with the valueDefaultin youruser-datafile. -
If your setup meets the following conditions, include the following
initramfsstage in youruser-datafile, replacing<interface-name>with the name of the network interface on your Edge host:-
Your host is a virtual machine.
-
The virtual machine uses a VMXNET3 adapter.
-
You are planning to use one of the following in your Edge cluster:
-
An overlay network.
-
Flannel for your CNI.
-
stages:
initramfs:
- name: "Disable UDP segmentation"
commands:
- ethtool --offload <interface-name> tx-udp_tnl-segmentation off
- ethtool --offload <interface-name> tx-udp_tnl-csum-segmentation offThis is due to a known issue with VMware's VMXNET3 adapter, which is widely used in different virtual machine management services, including VMware vSphere and Hyper-V.
-
View the newly created
user-datafile to ensure the token is set correctly.cat user-datatipYou can also edit user data in Local UI after installation. However, we recommend providing user data during EdgeForge for production workloads, as not all user data fields can be updated in Local UI.
-
(Optional) If you want to build multiple versions of a provider image using different Kubernetes versions, remove the
K8S_VERSIONargument from the.argfile. Open thek8s_version.jsonfile in the CanvOS directory. Remove the Kubernetes versions that you don't need from the JSON object corresponding to your Kubernetes distribution. -
Issue the following command to start the build process.
- Earthly Installed
- Earthly Not Installed
earthly +build-all-imagessudo ./earthly.sh +build-all-images===================== Earthly Build SUCCESS =====================
Share your logs with an Earthly account (experimental)! Register for one at https://ci.earthly.dev.infoIf you plan to build the Edge Installer ISO using a content bundle, use the
+build-provider-imagesoption instead of the+build-all-imagesoption in the command above. The commandsudo ./earthly.sh +build-provider-imageswill build the provider images but not the Edge installer ISO. After the provider images are built, follow the steps in the Build Content Bundle guide to build the Edge installer ISO using a content bundle.This command may take up to 15-20 minutes to finish depending on the resources of the host machine. Upon completion, the command will display the manifest, as shown in the example below, that you will use in your cluster profile later in this tutorial. Note that the
system.xxxxxattribute values in the manifest example are the same as what you defined earlier in the.argfile.Copy and save the output attributes in a notepad or clipboard to use later in your cluster profile.
pack:
content:
images:
- image: "{{.spectro.pack.edge-native-byoi.options.system.uri}}"
# Below config is default value, please uncomment if you want to modify default values
# drain:
#cordon: true
#timeout: 60 # The length of time to wait before giving up, zero means infinite
#gracePeriod: 60 # Period of time in seconds given to each pod to terminate gracefully. If negative, the default value specified in the pod will be used
#ignoreDaemonSets: true
#deleteLocalData: true # Continue even if there are pods using emptyDir (local data that will be deleted when the node is drained)
#force: true # Continue even if there are pods that do not declare a controller
#disableEviction: false # Force drain to use delete, even if eviction is supported. This will bypass checking PodDisruptionBudgets, use with caution
#skipWaitForDeleteTimeout: 60 # If pod DeletionTimestamp older than N seconds, skip waiting for the pod. Seconds must be greater than 0 to skip.
options:
system.uri:
"{{ .spectro.pack.edge-native-byoi.options.system.registry }}/{{
.spectro.pack.edge-native-byoi.options.system.repo }}:{{
.spectro.pack.edge-native-byoi.options.system.k8sDistribution }}-{{ .spectro.system.kubernetes.version }}-{{
.spectro.pack.edge-native-byoi.options.system.peVersion }}-{{
.spectro.pack.edge-native-byoi.options.system.customTag }}"
system.registry: spectrocloud
system.repo: ubuntu
system.k8sDistribution: k3s
system.osName: ubuntu
system.peVersion: v4.7.2
system.customTag: palette-learn
system.osVersion: 22 -
List the Docker images to review the provider images created. You can identify the provider images by reviewing the image tag value you used in the
.argfile'sCUSTOM_TAGargument.docker images --filter=reference='*/*:*palette-learn'REPOSITORY TAG IMAGE ID CREATED SIZE
spectrocloud/ubuntu k3s-1.33.5-v4.7.2-palette-learn 075134ad5d4b 10 minutes ago 4.11GB -
To use the provider image with your Edge deployment, push it to the image registry specified in the
.argfile. Log in to your container registry. Provide your credentials when prompted. The example below provides a Docker login command.docker login -
Once authenticated, push the provider image to the registry so that your Edge host can download it during the cluster deployment.
docker push $IMAGE_REGISTRY/ubuntu:k3s-1.33.5-v4.7.2-palette-learn -
After pushing the provider images to the image registry, open a web browser and log in to Palette. Ensure you are in the Default project scope before creating a cluster profile.
-
Navigate to the left Main Menu and select Profiles. Click on the Add Cluster Profile button, and fill out the required basic information fields to create a cluster profile for Edge.
-
Add the following BYOS Edge OS pack to the OS layer in the Profile Layers section.
Pack Type Registry Pack Name Pack Version OS Public Repo BYOS Edge OS 1.0.0 -
Replace the cluster profile's BYOOS pack manifest with the following custom manifest so that the cluster profile can pull the provider image from the image registry.
The
system.xxxxxattribute values below refer to the arguments defined in the.argfile. If you modified the arguments in the.argfile, you must modify the attribute values below accordingly.pack:
content:
images:
- image: "{{.spectro.pack.edge-native-byoi.options.system.uri}}"
# Below config is default value, please uncomment if you want to modify default values
# drain:
#cordon: true
#timeout: 60 # The length of time to wait before giving up, zero means infinite
#gracePeriod: 60 # Period of time in seconds given to each pod to terminate gracefully. If negative, the default value specified in the pod will be used
#ignoreDaemonSets: true
#deleteLocalData: true # Continue even if there are pods using emptyDir (local data that will be deleted when the node is drained)
#force: true # Continue even if there are pods that do not declare a controller
#disableEviction: false # Force drain to use delete, even if eviction is supported. This will bypass checking PodDisruptionBudgets, use with caution
#skipWaitForDeleteTimeout: 60 # If pod DeletionTimestamp older than N seconds, skip waiting for the pod. Seconds must be greater than 0 to skip.
options:
system.uri:
"{{ .spectro.pack.edge-native-byoi.options.system.registry }}/{{
.spectro.pack.edge-native-byoi.options.system.repo }}:{{
.spectro.pack.edge-native-byoi.options.system.k8sDistribution }}-{{ .spectro.system.kubernetes.version }}-{{
.spectro.pack.edge-native-byoi.options.system.peVersion }}-{{
.spectro.pack.edge-native-byoi.options.system.customTag }}"
system.registry: spectrocloud
system.repo: ubuntu
system.k8sDistribution: k3s
system.osName: ubuntu
system.peVersion: v4.7.2
system.customTag: palette-learn
system.osVersion: 22The screenshot below displays how to reference a provider image in the BYOOS pack of your cluster profile.
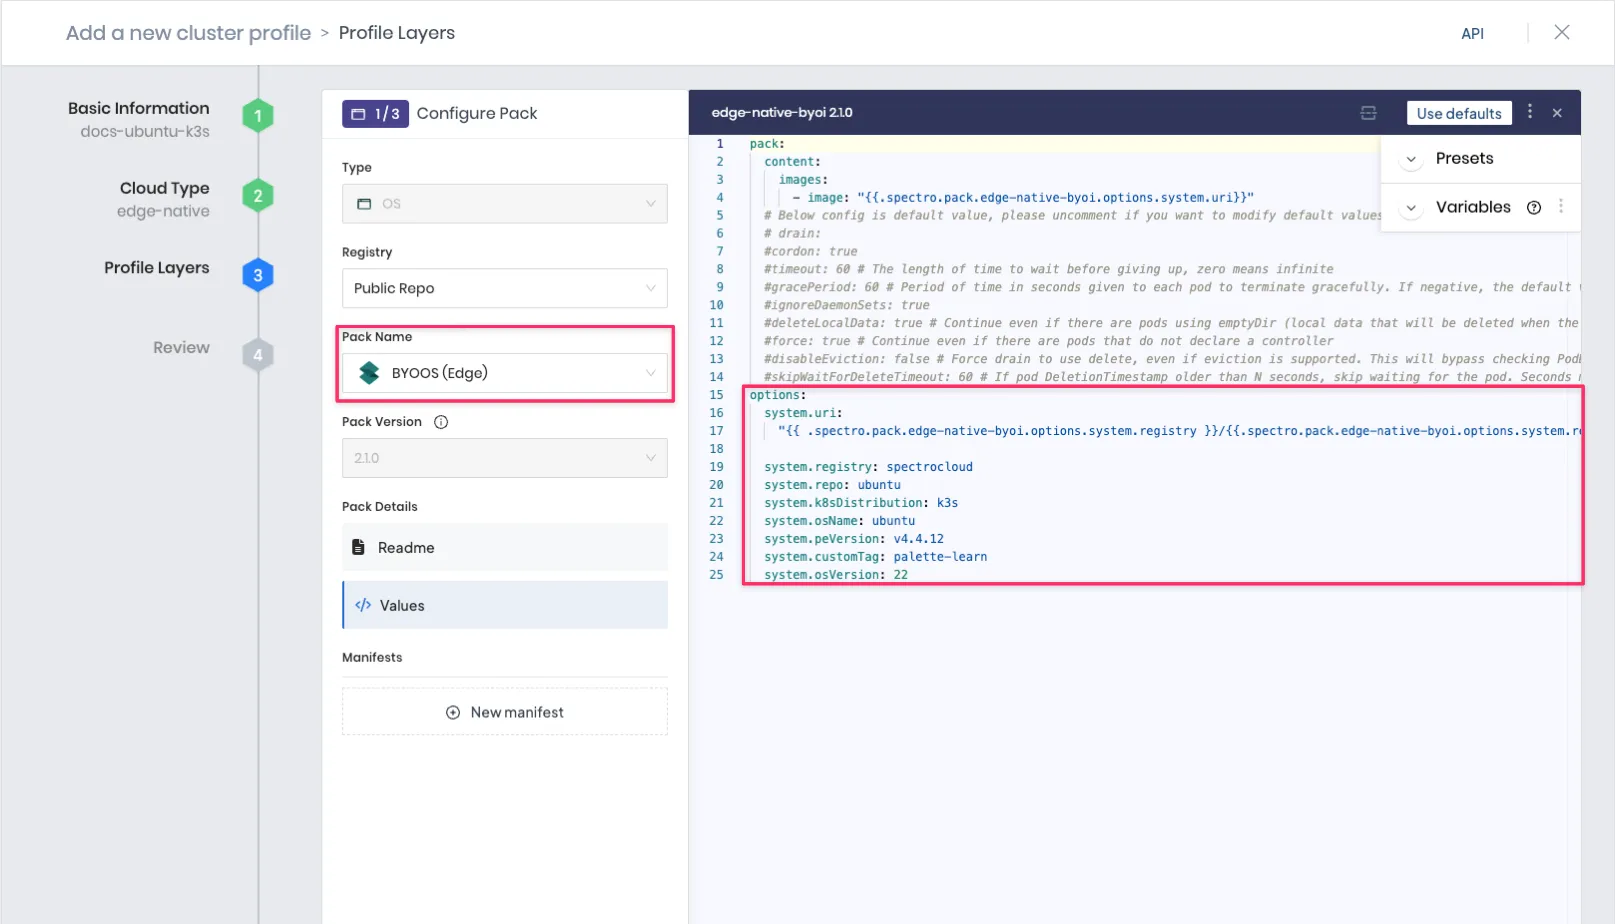 info
infoThe BYOOS pack's
system.uriattribute references the Kubernetes version selected in the cluster profile by using the{{ .spectro.system.kubernetes.version }}macro. This is how the provider images you created and pushed to a registry are tied to the OS and Kubernetes version you selected in the.argfile. -
Add the following Palette Optimized K3s pack to the Kubernetes layer of your cluster profile. Select the k3s version 1.33. because earlier in this how-to guide, you pushed a provider image compatible with k3s v1.33.5 to an image registry.
Pack Type Registry Pack Name Pack Version Kubernetes Public Repo Palette Optimized k3s 1.33.x -
Add the network layer to your cluster profile, and choose a Container Network Interface (CNI) pack that best fits your needs, such as Calico, Flannel, Cilium, or Custom CNI. For example, you can add the following network layer. This step completes the core infrastructure layers in the cluster profile.
Pack Type Registry Pack Name Pack Version Network Public Repo Calico 3.25.x -
Add add-on layers and manifests to your cluster profile per your requirements.
-
If there are no errors or compatibility issues, Palette displays the newly created complete cluster profile for review. Verify the layers you added, and finish creating the cluster profile.
To build multiple versions of a provider image with different Kubernetes versions, use the k8s_version.json file in the repository. You must leave the K8S_VERSION field in your .arg file empty to use the JSON file. This file is only used when K8S_VERSION is not detected as an argument.
For example, if your .arg file contains the following arguments, the full image reference would be
ttl.sh/ubuntu:k3s-1.33.5-v4.7.2-demo.
IMAGE_REGISTRY=ttl.sh
IMAGE_REPO=ubuntu
CUSTOM_TAG=demo
K8S_DISTRIBUTION=k3s
K8S_VERSION=1.33.5
OS_DISTRIBUTION=ubuntu
OS_VERSION=22
The .arg file uses the default values for any remaining arguments. Refer to Edge Artifact Build Configurations for all available .arg configuration parameters.
Using the arguments defined in the .arg file, the final provider images you generate will have the following naming convention, [IMAGE_REGISTRY]/[IMAGE_REPO]:[CUSTOM_TAG]. For example, one of the provider images might be spectrocloud/ubuntu:k3s-1.33.5-v4.7.2-palette-learn.
The K8S_DISTRIBUTION argument, defined in the .arg file, accepts canonical as a valid value. This value
corresponds to the Palette Optimized Canonical pack, which is a Tech Preview feature and is subject to change. Do
not use this feature in production workloads.
Validate
List the Edge installer ISO image and checksum by issuing the following command from the CanvOS directory.
ls build/
palette-edge-installer.iso
palette-edge-installer.iso.sha256
You can validate the ISO image by creating a bootable USB flash drive using any third-party software and attempting to flash a bare host machine. Most software that creates a bootable USB drive will validate the ISO image. Here, the flash process means installing the necessary tools and configurations on a host machine.
Prerequisites
To complete this advanced guide, you will need the following items:
-
A physical or virtual Linux machine with AMD64 (also known as x86_64) processor architecture to build the Edge artifacts. You can issue the following command in the terminal to check your processor architecture.
uname -m -
Minimum hardware configuration of the Linux machine:
- 4 CPU
- 8 GB memory
- 150 GB storage
-
Git. You can ensure git installation by issuing the
git --versioncommand. -
(Optional) Earthly is installed and available. If you do not install Earthly, you can still build the artifacts, but it would require root privileges, and some of the resulting artifacts will be owned by the root user.
-
An image management tool such as Docker or crane is installed and available.
infoIf you do not install Earthly, you must install Docker.
-
A Spectro Cloud account. If you have not signed up, you can sign up for an account here.
-
Palette registration token for pairing Edge hosts with Palette. You will need tenant admin access to Palette to generate a new registration token. For detailed instructions, refer to the Create Registration Token guide.
-
Access to an image registry.
infoThis guide uses a public Docker Hub registry as an example. You can use any other image registry that suits your requirements.
-
A public repository named
opensuse-leapin your image registry. Refer to the Create a repository instructions for creating a Docker Hub repository and setting the repository's visibility topublic.
Instructions
Use the following instructions on your Linux machine to customize the arguments and Dockerfile and then create all the
required Edge artifacts.
-
Check out the CanvOS GitHub repository containing the starter code.
git clone https://github.com/spectrocloud/CanvOS.git -
Change to the
CanvOSdirectory.cd CanvOS -
View the available git tag.
git tag -
(Optional) If you are using a self-hosted instance of Palette, you need to build the ISO using the corresponding CanvOS version. Use the following command to identify the agent version for your Palette instance. Replace
<palette-endpoint>with your Palette endpoint and<api-key>with your Palette API key.curl --location --request GET 'https://<palette-endpoint>/v1/services/stylus/version' --header 'Content-Type: application/json' --header 'Apikey: <api-key>' | jq --raw-output '.spec.latestVersion.content | match("version: ([^\n]+)").captures[0].string'The output is the version number you must use to build the ISO. For example, if the output is
4.5.15, you must check out thev4.5.15tag in the CanvOS repository to build the ISO.Example output4.5.15
-
If you are using a self-hosted instance of Palette and have determined a specific CanvOS version, checkout out the corresponding tag.
Otherwise, check out the newest available tag. This guide uses v4.7.2 tag as an example.
git checkout v4.7.2 -
Review the files relevant for this guide.
.arg.template- A sample.argfile that defines arguments to use during the build process.Dockerfile- Embeds the arguments and other configurations in the image.Earthfile- Contains a series of commands to create target artifacts.earthly.sh- Script to invoke theEarthfile, and generate target artifacts.user-data.template- A sample file containing user data.
For more information about preparing the .arg file, refer to
Prepare User Data and Argument Files
-
Copy the .arg.template file from the CanvOS directory and name the copy .arg. Edit the
.argfile to include the following arguments. These are the most commonly used arguments.ARCHOS_DISTRIBUTIONOS_VERSIONK8S_DISTRIBUTIONK8S_VERSIONIMAGE_REGISTRYIMAGE_REPOCUSTOM_TAG
-
Specify the system architecture, OS distribution, and version. These configurations apply to your Edge host's OS both before and after cluster formation.
- Specify the Kubernetes distribution and version. This is used with the OS distribution and version to create an immutable provider image with your specified OS and Kubernetes.
- Specify the image registry, image repository name, and custom tag for your provider images. The custom tag, together with the Palette agent version (the same number as the Git tag you are using), the version and distribution of Kubernetes, and the OS used by the image forms the tag of the image.
-
(Optional) This step is only required if your builds occur in a proxied network environment, and your proxy servers require client certificates, or if your base image is in a registry that requires client certificates.
You can provide the base-64 encoded certificates in PEM format in the
certsfolder at the root directory of theCanvOSrepository. You can provide as many certificates as you need in the folder.If you are using a CanvOS tag that is earlier than
4.5.15, you need to use thePROXY_CERT_PATHbuild argument to provide a path to the certificate. This approach only allows you to specify one certificate. For more information, refer to Earthly Build Arguments.warningThese proxy settings are only configured for the build process itself, when your builder machine needs to pull certain images to build the Edge artifacts. These certificates will not be present on the host after it has been deployed. To configure the proxy network settings for a host, refer to Configure HTTP Proxy or Configure Proxy in User Data.
-
Use the following command to append the WireGuard installation instructions to the
Dockerfile. You can install more tools and dependencies and configure the image to meet your needs. Add your customizations below the line tagged with theAdd any other image customizations herecomment in theDockerfile. Do not edit or add any lines before this tagged comment.echo 'RUN sudo zypper refresh && sudo zypper install --non-interactive wireguard-tools' >> DockerfileView the newly created file to ensure the instruction to install WireGuard is appended correctly.
cat DockerfilewarningUsing the
-yoption with thesudo zypper installcommand is critical to successfully build the images. The default behavior for package installations is to prompt the user for permission to install the package. A user prompt will cause the image creation process to fail. This guidance applies to all dependencies you add through theDockerfile. -
From the CanvOS directory, copy the user-data.template file and name the copy user-data. Edit the
user-datafile to include the following fields understylus.site.edgeHostTokenpaletteEndpointprojectName
The
user-datafile uses thecloud-initcloud-configformat. The first line of your file must be#cloud-configto ensure thatcloud-initrecognizes and applies the configuration correctly. Delete any unused arguments.#cloud-config
stylus:
site:
...Refer to Prepare User Data and Argument Files for more information about configuring your
user-datafile and to review sample files for different use cases. Refer to Cloud Init Stages, and the Edge Installer Configuration Reference for supported keys and stages.warningIf you haven't set a default project for the registration token, ensure that you provide the
stylus.site.projectNameparameter with the valueDefaultin theuser-datafile.You can also edit user data in Local UI after installation. However, we recommend providing user data during EdgeForge for production workloads, as not all user data fields can be updated in Local UI.
infoIf you need to pull images from a private image registry, you can supply the credentials for the registry in the
user-datafile in theregistryCredentialsfield or in the cluster profile. Credentials specified in theuser-datafile overwrite the credentials provided in the cluster profile. To learn how to provide credentials in cluster profiles, refer to Deploy Cluster with a Private Registry.View the newly created
user-datafile to ensure the token is set correctly.cat user-data
To build multiple versions of a provider image with different Kubernetes versions, use the k8s_version.json file in the repository. You must leave the K8S_VERSION field in your .arg file empty to use the JSON file. This file is only used when K8S_VERSION is not detected as an argument.
For example, if your .arg file contains the following arguments, the full image reference would be
ttl.sh/ubuntu:k3s-1.33.5-v4.7.2-demo.
IMAGE_REGISTRY=ttl.sh
IMAGE_REPO=ubuntu
CUSTOM_TAG=demo
K8S_DISTRIBUTION=k3s
K8S_VERSION=1.33.5
OS_DISTRIBUTION=ubuntu
OS_VERSION=22
The .arg file uses the default values for any remaining arguments. Refer to Edge Artifact Build Configurations for all available .arg configuration parameters.
Using the arguments defined in the .arg file, the final provider images you generate will have the following naming convention, [IMAGE_REGISTRY]/[IMAGE_REPO]:[CUSTOM_TAG]. For example, one of the provider images might be spectrocloud/ubuntu:k3s-1.33.5-v4.7.2-palette-learn.
The K8S_DISTRIBUTION argument, defined in the .arg file, accepts canonical as a valid value. This value
corresponds to the Palette Optimized Canonical pack, which is a Tech Preview feature and is subject to change. Do
not use this feature in production workloads.
View the newly created file to ensure the customized arguments are set correctly.
cat .arg
Ensure the final artifact name conforms to the [IMAGE_REGISTRY]/[IMAGE_REPO]:[CUSTOM_TAG]naming pattern.
Refer to the Edge Configuration Stages and User Data Parameters documents to learn more.
-
CanvOS utility uses Earthly to build the target artifacts. Issue the following command to start the build process.
- Earthly Installed
- Earthly Not Installed
earthly +build-all-imagessudo ./earthly.sh +build-all-images# Output condensed for readability
===================== Earthly Build SUCCESS =====================
Share your logs with an Earthly account (experimental)! Register for one at https://ci.earthly.dev.infoIf you plan to build the Edge Installer ISO using a content bundle, use the
+build-provider-imagesoption instead of the+build-all-imagesoption in the command above. The commandsudo ./earthly.sh +build-provider-imageswill build the provider images but not the Edge installer ISO. After the provider images are built, follow the steps in the Build Content Bundle guide to build the Edge installer ISO using a content bundle.infoThis command may take up to 15-20 minutes to finish depending on the resources of the host machine. Upon completion, the command will display the manifest, as shown in the example below, that you will use in your cluster profile later in this tutorial. Note that the
system.xxxxxattribute values in the manifest example are the same as what you defined earlier in the.argfile.Copy and save the output attributes in a notepad or clipboard to use later in your cluster profile.
pack:
content:
images:
- image: "{{.spectro.pack.edge-native-byoi.options.system.uri}}"
# Below config is default value, please uncomment if you want to modify default values
#drain:
#cordon: true
#timeout: 60 # The length of time to wait before giving up, zero means infinite
#gracePeriod: 60 # Period of time in seconds given to each pod to terminate gracefully. If negative, the default value specified in the pod will be used
#ignoreDaemonSets: true
#deleteLocalData: true # Continue even if there are pods using emptyDir (local data that will be deleted when the node is drained)
#force: true # Continue even if there are pods that do not declare a controller
#disableEviction: false # Force drain to use delete, even if eviction is supported. This will bypass checking PodDisruptionBudgets, use with caution
#skipWaitForDeleteTimeout: 60 # If pod DeletionTimestamp older than N seconds, skip waiting for the pod. Seconds must be greater than 0 to skip.
options:
system.uri: "{{ .spectro.pack.edge-native-byoi.options.system.registry }}/{{ .spectro.pack.edge-native-byoi.options.system.repo }}:{{ .spectro.pack.edge-native-byoi.options.system.k8sDistribution }}-{{ .spectro.system.kubernetes.version }}-{{ .spectro.pack.edge-native-byoi.options.system.peVersion }}-{{ .spectro.pack.edge-native-byoi.options.system.customTag }}"
system.registry: spectrocloud
system.repo: opensuse-leap
system.k8sDistribution: k3s
system.osName: opensuse-leap
system.peVersion: v4.7.2
system.customTag: palette-learn
system.osVersion: -
List the Docker images to review the provider images created. By default, provider images for all the Palette's Edge-supported Kubernetes versions are created. You can identify the provider images by reviewing the image tag value you used in the
.argfile'sCUSTOM_TAGargument.docker images --filter=reference='*/*:*palette-learn'REPOSITORY TAG IMAGE ID CREATED SIZE
spectrocloud/opensuse-leap k3s-1.33.5-v4.7.2-palette-learn 2427e3667b2f 24 minutes ago 2.22GB -
To use the provider images in your cluster profile, push them to the image registry mentioned in the
.argfile. Issue the following command to log in to Docker Hub. Provide your Docker ID and password when prompted.docker loginLogin Succeeded -
Use the following commands to push the provider images to the Docker Hub image registry you specified. Replace
spectrocloudand the version numbers in the command below with your Docker ID and respective Kubernetes versions that the utility created.docker push spectrocloud/opensuse-leap:k3s-1.33.5-v4.7.2-palette-learn -
After pushing the provider images to the image registry, open a web browser and log in to Palette. Ensure you are in the Default project scope before creating a cluster profile.
-
Navigate to the left Main Menu and select Profiles. Click on the Add Cluster Profile button, and fill out the required basic information fields to create a cluster profile for Edge.
-
Add the following BYOS Edge OS pack to the OS layer in the Profile Layers section.
Pack Type Registry Pack Name Pack Version OS Public Repo BYOS Edge OS 1.0.0 -
Replace the cluster profile's BYOOS pack manifest with the output that was provided to you earlier and that you copied.
The
system.xxxxxattribute values below refer to the arguments defined in the.argfile. If you modified the arguments in the.argfile, you must modify the attribute values below accordingly.pack:
content:
images:
- image: "{{.spectro.pack.edge-native-byoi.options.system.uri}}"
# Below config is default value, please uncomment if you want to modify default values
#drain:
#cordon: true
#timeout: 60 # The length of time to wait before giving up, zero means infinite
#gracePeriod: 60 # Period of time in seconds given to each pod to terminate gracefully. If negative, the default value specified in the pod will be used
#ignoreDaemonSets: true
#deleteLocalData: true # Continue even if there are pods using emptyDir (local data that will be deleted when the node is drained)
#force: true # Continue even if there are pods that do not declare a controller
#disableEviction: false # Force drain to use delete, even if eviction is supported. This will bypass checking PodDisruptionBudgets, use with caution
#skipWaitForDeleteTimeout: 60 # If pod DeletionTimestamp older than N seconds, skip waiting for the pod. Seconds must be greater than 0 to skip.
options:
system.uri:
"{{ .spectro.pack.edge-native-byoi.options.system.registry }}/{{
.spectro.pack.edge-native-byoi.options.system.repo }}:{{
.spectro.pack.edge-native-byoi.options.system.k8sDistribution }}-{{ .spectro.system.kubernetes.version }}-{{
.spectro.pack.edge-native-byoi.options.system.peVersion }}-{{
.spectro.pack.edge-native-byoi.options.system.customTag }}"
system.registry: spectrocloud
system.repo: opensuse-leap
system.k8sDistribution: k3s
system.osName: opensuse-leap
system.peVersion: v4.7.2
system.customTag: palette-learn
system.osVersion:The screenshot below displays how to reference a provider image in the BYOOS pack of your cluster profile.
infoThe BYOOS pack's
system.uriattribute references the Kubernetes version selected in the cluster profile by using the{{ .spectro.system.kubernetes.version }}macro. This is how the provider images you created and pushed to a registry are tied to the OS and Kubernetes version you selected in the.argfile. -
Add the following Palette Optimized K3s pack to the Kubernetes layer of your cluster profile. Select the K3s version 1.27.x because earlier in this how-to guide, you pushed a provider image compatible with k3s v1.27.2 to the image registry.
Pack Type Registry Pack Name Pack Version Kubernetes Public Repo Palette Optimized K3s 1.27.x -
Add the network layer to your cluster profile, and choose a Container Network Interface (CNI) pack that best fits your needs, such as Calico, Flannel, Cilium, or Custom CNI. For example, you can add the following network layer. This step completes the core infrastructure layers in the cluster profile.
Pack Type Registry Pack Name Pack Version Network Public Repo Calico 3.25.x -
Add add-on layers and manifests to your cluster profile per your requirements.
-
If there are no errors or compatibility issues, Palette displays the newly created complete cluster profile for review. Verify the layers you added, and finish creating the cluster profile.
Validate
List the Edge installer ISO image and checksum by issuing the following command from the CanvOS directory.
ls build/
palette-edge-installer.iso
palette-edge-installer.iso.sha256
You can validate the ISO image by creating a bootable USB flash drive using any third-party software and attempting to flash a bare host machine. Most software that creates a bootable USB drive will validate the ISO image. Here, the flash process means installing the necessary tools and configurations on a host machine.
Next Steps
After building the Edge artifacts and creating an Edge cluster profile, the next step is to use the Edge installer ISO image to prepare your Edge host. To learn more about utilizing Edge artifacts to prepare Edge hosts and deploy Palette-managed Edge clusters, we encourage you to check out the reference resources below.